Maze Game
The first real game of the course. You design a maze on paper, swap with a partner, draw your partner’s maze in Scratch, then make it playable with events, conditionals, and a loop.
Schedule
| Project Day | Plan |
|---|---|
| 1 | Maze Design — analyze example mazes, design one on the worksheet, swap and review, draw your partner’s maze in Scratch |
| 2 | Controls and Walls — arrow-key movement, then an if touching color wall reset inside a forever loop |
| 3 | Loops + Conditionals — a collectable coin, a score variable, and a win condition, built from a blank project |
Project Day 1: Maze Design
Analyze Example Mazes
Look at the three mazes. Which is easiest? Which is hardest? Why? What makes a maze fun, and what makes it frustrating? How wide do the paths need to be for a small sprite to fit?
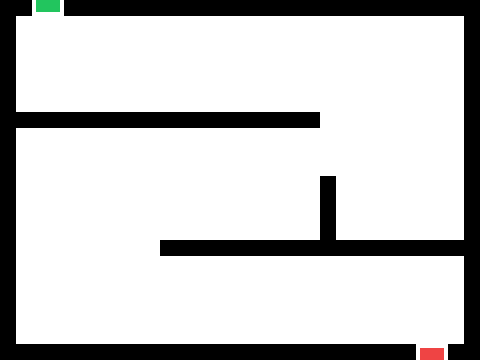
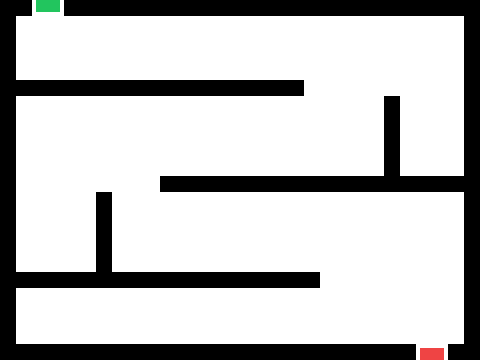
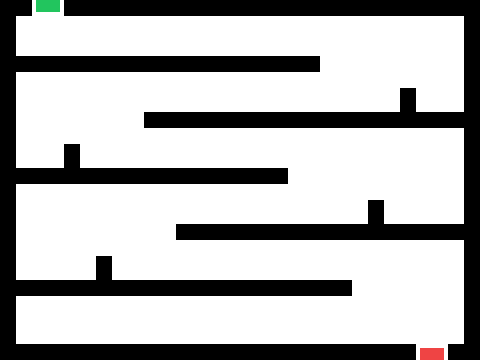
Design Rules
- 40 squares wide × 30 squares tall — the shape of the Scratch stage.
- Paths at least 2 squares wide — so a sprite fits without touching the walls.
- Clear start and finish — mark them S and F.
- At least one dead end.
- Solvable — at least one path from start to finish.
Design, Swap, Review
Print: Maze Design Worksheet- Design (about 8 minutes). Sketch your maze on the worksheet in pencil. Follow every rule. Trace the solution lightly to make sure it works.
- Swap and review (about 3 minutes). Trade with your partner. Trace a path from start to finish on their maze. Can you solve it? Are the paths wide enough? Write one piece of feedback on the back.
- Return. End with your partner’s maze. That is the one you build.
Draw the Maze in Scratch
Remix the Maze Starter Project- Select the Maze sprite and its grid costume. The grid matches the 40 × 30 worksheet.
- Use the fill tool to color the walls, all in one color. Delete the squares that are paths. Keep paths at least two squares wide.
- Add a small sprite from the library to be the player, shrink it if needed, and place it at the start.
See Scratch Art Tools for the fill tool and shapes.
Project Day 2: Controls and Walls
Open the maze project. Lost it? Remix the starter project above and draw a quick maze.
Keyboard Controls
Add four when key pressed blocks to the player sprite, one per arrow key — the Arrow-Key Movement pattern. Click the green flag and navigate from start to finish. If the paths are too tight or the sprite moves too fast, change 10 to 5.
Wall Collision
Right now the sprite walks through walls. Add the Wall Reset pattern: a forever loop with if touching color that sends the sprite back to the start.
- Click the color swatch in
touching colorand use the eyedropper to pick the exact wall color. - Set the
go tocoordinates to the start position. Drag the sprite there and read x and y below the stage. - If your walls are their own sprite,
touching [Maze v]?works too.
Challenge: instead of resetting to the start, undo the last move when the sprite touches a wall. You will need to move the opposite direction by the same amount.
Project Day 3: Loops and Conditionals
Start from a blank project. Build a program with all four of these:
- A sprite the player moves with the arrow keys or WASD. Use either movement pattern from Code Patterns.
- A coin or other collectable that adds 1 to
scorewhen touched, then jumps to a random position — the Score and Collect pattern. - A
foreverloop containing at least twoifblocks that respond to different events. - A
scorevariable that changes when a condition is met.
Ideas for the second condition: touching a wall color resets the position; the score reaching 10 says “You win!” and stops the game.
if <(score) = (10)> then
  say [You win!] for (2) seconds
  stop [all v]
end
Why the Loop Matters
Without the forever loop, each if block runs once when the green flag is clicked and then stops. The loop makes Scratch check every condition every frame while the game runs. That is the game loop pattern, and nearly every game you have played is built on it.
Checkpoints
Day 1
- My maze follows all five design rules.
- I reviewed my partner’s maze and left one piece of feedback.
- My partner’s maze is drawn in Scratch with a player sprite at the start.
Day 2
- Four
when key pressedblocks move the player. - A
foreverloop withif touching colorsends the player back to the start. - I used the eyedropper to pick the exact wall color.
Day 3
- My project has a
foreverloop with at least twoifblocks inside it. - A
scorevariable goes up when the player touches the collectable. - The collectable moves to a new position after it is collected.
Teacher Notes
- Day 1 is a paper day for the first half. Pencils, not pens — students revise after the swap.
- Students build their partner’s maze, which is why the design rules matter: an unsolvable or too-narrow maze becomes someone else’s problem.
- Day 2 pairs well with an Edpuzzle on user input as the warmup; Day 3 pairs well with a Code.org loops lesson.
- The Day 3 build-from-blank is the first independent check of whether the patterns stuck. Keep the starter-project link handy for anyone who has lost their work.